Frequently Asked Questions
You can display your menu content in two modes:
List Display (Default)
This mode closely resembles a traditional display. Dishes are listed one below the other. Additional information is accessible by clicking on the name of a dish.
 |
 |
|---|---|
| Display on Desktop | Display on Mobile |
Grid Display
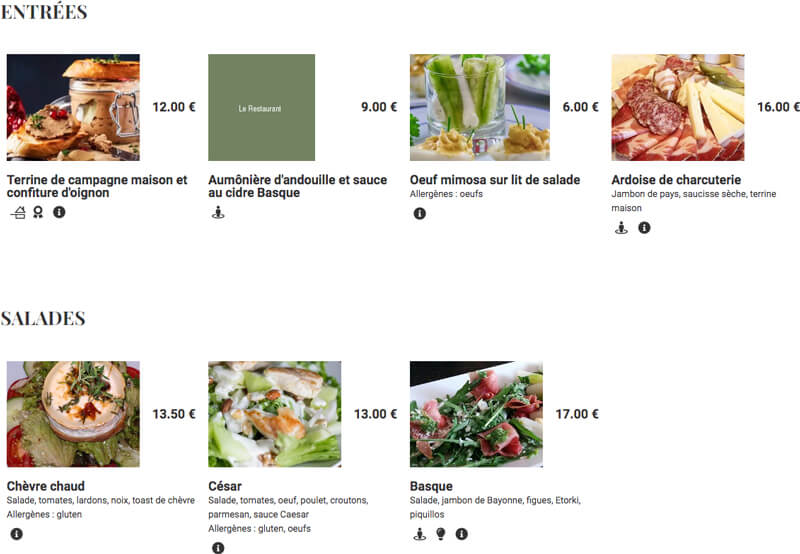
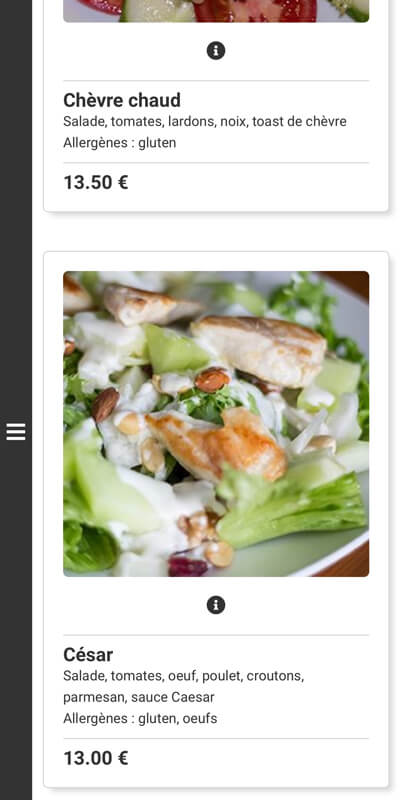
This mode is more pleasant to use when you have images illustrating your dishes; indeed, in this mode, the images are directly visible.
 |
 |
|---|---|
| Display on Desktop | Display on Mobile |
Every job deserves payment
While it’s nice to benefit from free services, it must be acknowledged that every service requires investments and operating costs.
We cover:
- Website hosting
- Domain name purchase
- Hosting of your menus
- Hosting of your image files
- Website SEO
- etc.
So, rather than offering a free plan provided at a loss, with the risk of the service disappearing or suddenly becoming paid, at Carte de Restaurant, we prefer to provide you with a quality service, starting from the basic plan (“One Shot”), for a fair cost.
Compare our plans!
And subscribe to our social networks to always be informed of the best deals!
We’re sorry to see you go! Would you like to talk to us?
Anyway, at Carte de Restaurant, there’s no commitment, so if you really want to cancel your subscription, here’s how:
- Go to your customer area
- Click on the “Subscriptions” tab
- Click on the “Details” link next to your current subscription
- Click on the “Cancel” button next to the label “Cancel subscription”
You will be asked to choose between three options:
- Cancel immediately
- Cancel at the end of the billing cycle
- Cancel on a scheduled date
Once you’ve made your choice, click the “Submit” button.
You will receive a confirmation email shortly.
You may already have a menu in PDF format, and thus offer your customers the ability to view it securely, but is that a performance solution?
At Carte de Restaurant, we offer a dynamic, optimized, and intuitive web-based (HTML) menu.
A brief objective comparison?
| Carte de Restaurant | ||
| Multilingual | No PDF cannot be dynamic and you will be forced to have as many PDFs as languages offered |
Yes Without leaving the page, the visitor can access all the languages provided by the restaurant |
| Quick access to sections | No Creating a link to a section of a PDF is not always the easiest thing to do for the novice |
Yes A side menu allows quick access to the various sections of the menu |
| Customizable | Yes The rendering can be very graphic, provided you use a graphic designer |
Yes The rendering is less optimized for printing than the PDF format but all elements are accessible to your customers |
| Editable | Yes For a professional rendering, through a specific, expensive software, and not easy to transport |
Yes A simple web browser is enough to edit your menu, whenever and wherever you want |
| Printable | Yes This is the primary purpose of a PDF file |
Yes Simply by using the “Print” function of your browser |
| Requires a reader/plugin | Yes If your system does not natively “understand” the PDF format |
No A simple web browser, available on your smartphone, allows access to the entire menu |
| Indexed by search engines | Yes Possible but less efficient and more random than the indexing of a web page |
Yes Like any web page, your menus are detected and indexed by search engines |
Convinced? Compare our plans
Yes!
Your digital menu is accessible through your customers’ mobile browser, so they need to have an internet connection (mobile data or Wi-Fi) to access your menu.
Ensure that mobile networks reach your establishment or, ideally, provide free Wi-Fi service to your customers.
The currently accepted payment methods are as follows:
Credit Card Payment
Use this payment method to ensure the quick availability of your digital menu. Upon validation of your payment, we activate your menu promptly to allow you to complete it as soon as possible.
With automatic monthly recurring payments, you ensure not to miss a deadline, risking the deactivation or deletion of your menu.
The payment, 100% secure, is handled by our trusted third party, “Stripe”.
Bank Transfer (SEPA Direct Debit)
Use this payment method to ensure the quick availability of your digital menu. Upon validation of your payment, we activate your menu promptly to allow you to complete it as soon as possible.
With monthly payments, you also ensure not to miss a deadline, risking the deactivation or deletion of your menu.
The payment is handled by our trusted third party, “Stripe”. You will receive a confirmation email from Stripe on behalf of our agency, “ID&A”.
The transaction will appear on your bank statement under the label “SARL ID&A”.
To offer your menu in multiple languages, you first need to choose the right plan.
Only the “Basic” (optional), “Pro,” and “Premium” plans offer the multilingual function.
Finally, you need to make sure you have the various translated texts available.
What Elements Are Translated?
The fixed elements of the menus are translated automatically. This includes: dish types, navigation menus, captions, etc.
The dishes that you integrate into your menu must be translated by you. Indeed, it would not be serious to use an automatic translation tool! Depending on the appellations or specific wordings, this could result in non-compliant or incomprehensible texts for your customers.
Do You Offer an Automatic Translation Tool?
No. As mentioned above, it seems unprofessional to use a tool like Google Translate to translate the elements of your menus. The translations generated in this way could be incorrect (partially or entirely) and inconvenience your customers.
Do You Offer a Paid Translation Service?
Not at the moment. Using professional translators incurs a cost, which must be repeated for each chosen language. Rather than offering an expensive service to everyone, we prefer to address the issue on a case-by-case basis.
What plan did you choose?
If you opted for the “One Shot” plan, it only allows us to edit your menu. Make sure to send us your menu as soon as possible so that we can proceed with its integration.
If you opted for the “Basic,” “Pro,” or “Premium” plans, make sure you have sent us your payment; if you haven’t paid by credit card, your menu will only be activated upon receipt of payment.
If you still can’t edit your menu despite this, don’t wait, send us a message so that we can address your request as soon as possible.
The “One Shot” plan allows for modifying(1) the content of your menu once a year. For professionals whose menu changes infrequently, this plan is perfectly suited.
For professionals needing to modify their menu content with each new season, it is recommended to opt for at least the “Basic” plan.
(1) It is important to note, however, that with the “One Shot” plan, the menu is not editable by the client but by our agency. Therefore, it is recommended to ensure that the menu content is error-free before submitting it to us for integration. However, if a minor error is detected afterwards, we will correct it promptly at no extra cost.
No!
We have chosen to maintain a service closest to your customers:
- Being seated at the table by a server;
- Being advised, if necessary, by the server, on dishes or food/wine pairings;
- Receiving the bill at the end of the meal, from the server, and having the opportunity to give feedback on the time spent in the establishment.
All of this is not possible with certain competing solutions!
As customers, if we were to deal with an app from the beginning to the end of our leisure time, we would opt for a fast-food establishment and not a traditional restaurant!
So, maintain the connection with your customers! Advise them, guide them, accompany them, and gather their impressions.
Yes.
You can test our tool simply by requesting it from us.
We will create temporary credentials (valid for 72 hours) allowing you to test our solution and see for yourself its ease of use.
Yes! Regardless of the chosen plan*, you can customize your menu according to your needs.
The modifications mainly include:
- Title font (1)
- Title alignment
- Text alignment
- Price alignment
- Title color
- Text color
- Price color
- Menu background color
- Separation visuals
- Presence of the sidebar menu
- Sidebar menu layout
- Sidebar menu color
- Alignment of elements in the sidebar menu
(1) IMPORTANT: Some fonts are subject to copyright, so you can only customize your titles based on the fonts available in your back office.
* Please note, the “One Shot” plan, while allowing visual customization of the menu, is not editable by you. We will handle integrating your content and strive to match your current paper menu’s visual as closely as possible.
If you want to quickly access the menu of your favorite restaurant, add it to the home screen of your Apple or Android smartphone and use it like a regular app.
On the Apple system, adding a web app (or Progressive Web App) is quite simple! This can only be done through the default browser, “Safari.”
- Open the “Safari” mobile browser
- Type the website address into the search bar
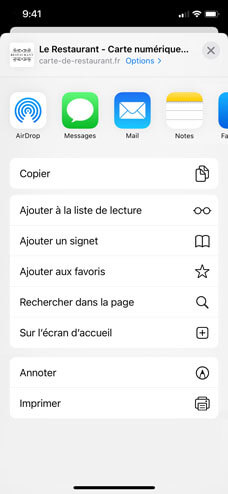
- Once you are on the site, tap the share button
 at the bottom
 - In the menu that appears, tap the “Add to Home Screen” button
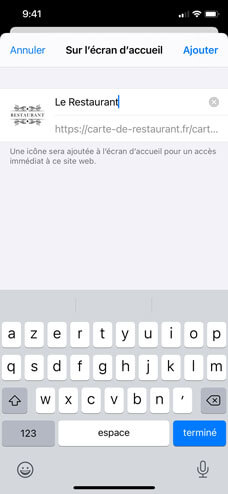
- A popup with the same name will appear, asking you to choose/check the shortcut name


- Tap “Add” in the top right corner
Your web app is now on the home screen of your smartphone. You just need to move it (if necessary) to the screen and/or folder of your choice.
Simply access your web app by tapping its icon like any other app.
If you are using “Chrome”
- Open the “Chrome” mobile browser
- Type the website address into the search bar
- Once you are on the site, tap the three vertical dots at the top right
- In the menu that appears, tap “Add to Home Screen”
- A popup with the same name will appear on the screen, asking you to choose/check the shortcut name
- Tap “Add” (you may then be prompted to manually place the item or have it added automatically)
- Return to the Android home screen where you should see the shortcut (web app)
Your web app is now on the home screen of your smartphone.
Simply access your web app by tapping its icon like any other application.
If you are using “Firefox”
- Open the “Firefox” mobile browser
- Type the website address into the search bar
- Once you are on the site, tap the home icon located at the top right
- In the menu that appears, tap “Add to Home Screen”
- A popup will appear on the screen
- Tap “Add to Home Screen” (you may then be prompted to manually place the item or have it added automatically)
- Return to the Android home screen where you should see the shortcut (web app)
Your web app is now on the home screen of your smartphone.
Simply access your web app by tapping its icon like any other application.